As I blogged previously, I've setup a Virtualbox inside Ubuntu Karmic and installed an old copy of WindowsXP and then iTunes.
I needed to upgrade to the latest version of the firmware and after some scouting around, it appeared possible back in v2 of Virtualbox, so I was hoping that v3 would be fine.
At first, it didn't work.
I couldn't work out why, but not long after the upgrade had started, the "preparing" message just kept cycling until a "can't do it" error message popped up. Restart the VM and tried again... nothing.
Then, as a matter of last resort, I noticed that just before the "preparing" message came up, the USB icon in the bottom left didn't flash. I right clicked and noticed that the iPhone had restarted and therefore wasn't checked in the list of USB.
So, if you recheck it each time the iPhone switches mode or restarts, everything works like a charm
Friday, August 14, 2009


Thursday, August 13, 2009
Running WindowsXP on VirtualBox on Ubuntu Karmic
Recently installed the latest alpha of Karmic and thought I'd give it a shot with VirtualBox and Windows XP.
The most important thing to do right now is realise the there are two version of VirtualBox:
Create a new virtual machine and follow the wizard. I chose to use the following settings:
Once this is done, double click on the newly created VM and follow the "First Run Wizard". Pop the XP installation CD in the drive and choose that as the media to use for installation.
The Windows installation proceeds: the only problem that I had was when trying to Eject the disc (the XP disc is an upgrade disc and I needed to put an old NT disc in). At first, the Eject just wouldn't happen - I joked that Windows clearly didn't want to leave the machine. After using the right click -> Eject option from the desktop a couple of times, it relented.
In fact, the whole process was far less stressful than it used to be installing it on a fresh box - the network worked first time and I didn't have to wait for the "34 minutes" while watching a blue screen. Instead, I could fire up firefox and do some surfin'.
When the VM needs keyboard or mouse action, life is very simple:
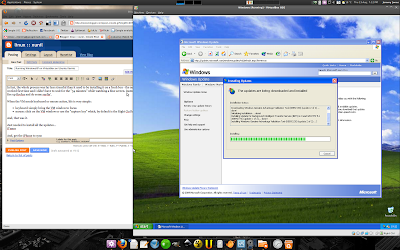
Just needed to install all the updates... trivial really, keep re-visiting the Updates page via the control panel, and install SP1, SP2, SP3 and a couple of other pieces of software and restarting the VM about 7 times!
NETWORK FOLDERS
Getting networked folders sorted is pretty simple too.
USB and iPHONE
Of course, this is only going to work if you've downloaded the PUEL version (see above).
The most important thing to do right now is realise the there are two version of VirtualBox:
- virtualbox-ose (open source edition) - no USB support
- virtualbox-puel - the one with USB support
sudo-s
apt-get install virtualbox-ose
- Then run it: Applications -> Accessories -> VirtualBox OSE
- add the following repro:
deb http://download.virtualbox.org/virtualbox/debian jaunty non-free
- then add the key and install it
wget -q http://download.virtualbox.org/virtualbox/debian/sun_vbox.asc -O- | sudo apt-key add -
sudo apt-get install virtualbox-3
- You should find it under Applications -> System Tools
Create a new virtual machine and follow the wizard. I chose to use the following settings:
- windows
- XP
- 512 MB RAM
- Dynamic HDD (max 50GB)
Once this is done, double click on the newly created VM and follow the "First Run Wizard". Pop the XP installation CD in the drive and choose that as the media to use for installation.
The Windows installation proceeds: the only problem that I had was when trying to Eject the disc (the XP disc is an upgrade disc and I needed to put an old NT disc in). At first, the Eject just wouldn't happen - I joked that Windows clearly didn't want to leave the machine. After using the right click -> Eject option from the desktop a couple of times, it relented.
In fact, the whole process was far less stressful than it used to be installing it on a fresh box - the network worked first time and I didn't have to wait for the "34 minutes" while watching a blue screen. Instead, I could fire up firefox and do some surfin'.
When the VM needs keyboard or mouse action, life is very simple:
- keyboard: simply bring the VM window to focus
- mouse: click on the VM window or use the "capture key" which, by default is the Right Ctrl key

Just needed to install all the updates... trivial really, keep re-visiting the Updates page via the control panel, and install SP1, SP2, SP3 and a couple of other pieces of software and restarting the VM about 7 times!
NETWORK FOLDERS
Getting networked folders sorted is pretty simple too.
- ensure that the VM is fired up
- install the "guest additions": from the VirtualBox menu: Devices -> Install Guest Additions
- follow the prompts from within the VM
- from the live VM window, choose Devices -> Shared Folders
- within the popup window, use the add button (top right) and choose the folder you want to share
- I chose to make the sharing permanent too
- within Windows, choose "Start -> Run"
- type "net use x: \\vboxsvr\NameOfYourFolderHere"
USB and iPHONE
Of course, this is only going to work if you've downloaded the PUEL version (see above).
- add yourself to the vboxusers group
- add this line to /etc/fstab, replacing XXX for the groupid of vboxusers: NB. most posts talk about /proc/bus/usb, but this didn't exist on my Karmic install, so I changed it to /dev/bus/usb
none /dev/bus/usb usbfs devgid=XXX,devmode=664 0 0
- restart your machine: some people say restart some services, some say logout...
- goto Control Panel -> System -> Hardware -> Device Manager
- check that the USB controller is installed correctly and there aren't any other drivers missing
- if there are problems, double click and choose to search for driver from the web
- check the iPhone is recognised by plugging it in and seeing if it is listed under the USB menu at the bottom or within the Devices menu
- click the checkbox next to them to ensure that Windows connects to them
- install iTunes
- done!
Monday, June 01, 2009
Zotero style
I’ve just been writing a zotero style for radiopaedia.org where I’m an editor. I didn’t have a seamless start to the process and found it pretty difficult to work out exactly what I should be writing, but after taking one of the other styles as a starting point and mashing it about, I finally got to our working copy.
The styles are writtin in CSL and have to validate against the RELAX_NG XML schema. Long story short, use this online tool:
- validator.nu
- encoding and parser can be left of auto
- schemas: http://xbiblio.svn.sourceforge.net/viewvc/xbiblio/csl/schema/trunk/csl.rnc
- check “Be lax about HTTP Content-Type”
And, after uploading and hitting validate you should be on your way.
As for getting the new style into firefox, just File->Open File from within Firefox.
And then, once happy, the task of getting it up to zotero rears it’s head. All the csl files are held in an SVN repository. So, we need to checkout the csl repro, We also need to have a zotero trac account to be able to submit our style.
Once the repro is checked out, we can add our style with an “svn add file.csl” and “svn commit”.
A couple of helpful pages:
Sunday, December 14, 2008
Amason S3 cloud backup
I’m looking at the S3 service from amazon as a solution for backing up all data from our Plesk servers. We already have backups saved to each server using totalbackup from 4psa, and to another server. However, they are all in the same datacentre, and it wouldbe nice to have another layer of redundancy.
- sign up to S3
- get the accesskey and secretkey
- use a service like s3browse.com to look at your space and create a “bucket”
- use something like duplicity to backup the entire system
S3 uses the concept of buckets to refer to a collection of all the data that is backed up. Each bucket has a name: however, each name is unique across all users. So, the ‘testing’ bucket won’t be available for anybody else.
Installing duplicity on ubuntu and setting up the backup
sudo apt-get install duplicity python-boto
Saturday, December 13, 2008
Spamassassin upgrade (Debain etch)
I needed to install the latest version of spamassassin on one of the servers because of the bug that flags false positive results for MS Outlook (http://wiki.apache.org/spamassassin/FORGED_MUA_OUTLOOK):
apt-get install debian-backports-keyring
Edit /etc/apt/sources.list
deb http://www.backports.org/debian etch-backports main contrib non-free
Do an apt-get update
apt-get -t etch-backports install spamassassin
Confirm whether you want to keep the old config files and the latest backport will be installed. You can check that latest version of all packages using:
dpkg -l
Friday, November 28, 2008
Plesk and qmail
I spent several hours this evening tying down a problem with the qmail server on one of our machines. Eventually, I found that 77000 messages had been sent from an auto-emailer function triggered by a malformed piece of MySQL on another server.
However, it has allowed me to find a use a couple of command line functions that I’ve not really used all that much before
/etc/init.d/qmail stop | start | restart
/var/qmail/bin/qmail=qstat
qmHandle -l
qmHandle -h’Subject: blah’
qmHandle is a helpful command line tool that allows you to manipulate the qmail queue (remembering that you need to edit the perl script once downloaded to set the user config)
# Set this to your qmail queue directory (be sure to include the final slash!)
my ($queue) = ‘/var/qmail/queue/’;
my ($bigtodo) = (-d “${queue}todo/0″) ? 0 : 1; # 1 means no big-todo# While this is if you have a Debian GNU/Linux with its qmail package
my ($stopqmail) = ‘/etc/init.d/qmail stop’;
my ($startqmail) = ‘/etc/init.d/qmail start’;# Enter here the system command which returns qmail PID.
my ($pidcmd) = ‘pidof qmail-send’;
Sunday, November 09, 2008
NautilusSVN
This is an absolute dream... like many who use SVN and have used Windows in the past, TortoiseSVN was it. There wasn't anything like it for Ubuntu... or at least that's what I thought until I took a look around and finally found: NautilusSVN on GoogleCode.
It's not as feature-rich as TortoiseSVN, but it does what it needs to do and has icon overlays which prettily tell you when files are out of sync with the repro.
Thanks guys!
It's not as feature-rich as TortoiseSVN, but it does what it needs to do and has icon overlays which prettily tell you when files are out of sync with the repro.
Thanks guys!
Subscribe to:
Posts (Atom)