Wednesday, January 31, 2007

phpEclipse

I have been look at PHP IDEs for a while now. I'm quite happy playing around with gEdit and having some rudimentary code colouring, but it get confused with PHP and HTML at times and doesn't really work too well when you add in Javascript.

I did use the trial version of Zend Studio 5 for while on a previous incarnation of my system, but an upgrade came and I didn't want to shell out a significant amount of money for an IDE. I'd love to find an open source alternative...

I have tried BlueFish (2/5) and nuSphere (a lot of cash for not as good as Zend) along with other not so impressive alternatives.

Finally I stumbled across phpEclipse and thought I'd give it a go. It seems though, that from other blogs and forums, installation on Ubuntu Edgy is no mean feat. So, armed with google, I set off on another intrepid adventure.

After installing Eclipse and phpEclipse, finding some bugs and searching the internet to find solutions, I became more aware of another project: EasyEclipse.

EasyEclipse:
It does extactly what it says on the tin and a simple download will give you a working copy for Windows, Linux or Mac. I chose EasyEclipse for PHP, but if you have a LAMP server, there is a version for LAMP control too Basically, the different distributions comes with different pre-loaded modules. The PHP one has PHP, SVN, HTMLTidy and many more.

The download is about 130Mb, so takes a wee while, but there is no "install": just run the app and it works. You'll need Java installed and it works with Blackwater (the opensource version) as well as the official Java from Sun.

SVN:
Once downloaded and running, "change perspective" using the menu or the top right button and choose 'SVN repository'. Using the left hand side taskbar, add a new repository (http://www.carrubbers.org/svn/ccc/www) and check out. You'll be asked if you want to create a new project (yes) and asked for the location. For me, with the current apache config the way it was, this was '/home/ccc/'. Once the checkout was compelete, I just needed non-SVN files: images, xml and dbf, along with .ht*, postgres login and symlinks (see the previous post).

PHP browser:
There is a build in browser which seems to work pretty well. You'll need to specify the document_root and localhost vars first:
Window->Preferences:
PHPeclipse...->Project Defaults ->
localhost and document root
If the document_root is wrong, Eclipse seems to think that files that are included by the PHP files are not within the current project and gives errors.

NB: I couldn't find how to use SVN for a while. It's under the Navigator context menu under "Team".

Now I just need to work out how to use the build in apache controls, get SVN icons rather than CVS ones on the navigation pane and see about Postgres control too.

Then there is the task of getting debugging working: DBG is allegedly a good tool to use and natively supported (client side) in eclipse. It's just a case of installing the software server side - I'll try it locally first!
Plesk and Courier IMAP

Seeing "Unable to connect to your IMAP server. You may have exceeded the maximum number of connections to this server" has been driving me insane!

Whenever I add another account to Thunderbird, I have to specify that it can only have one connection to the server per account and even then, if my wife switches on her machine, we have more than the prespecified Plesk maximum of 4 IMAP connections and we start getting errors.

I devided that enough was enough and went in search of a solution. I found it too :o)
perl -p -i -e 's/^MAXDAEMONS=40/MAXDAEMONS=80/g' /etc/courier-imap/imapd
perl -p -i -e 's/^MAXPERIP=4/MAXPERIP=40/g' /etc/courier-imap/imapd
Then a quick restart of the service and all should be working.
/etc/init.d/courier-imap stop
/etc/init.d/courier-imap start
These changes increase the maximum daemons to 80 and Maximum connections per IP to 40. Should be enought for us at the momnet, but may need altered in the future.

Local CCC

Getting a local copy of our website on my Ubuntu box for development purposes:


Local files:

We use svn on our church website as a versioning system and I need a local version for testing and development. First thing is to get a local copy of the repro and then add non-repro files (images etc).
sudo apt-get install subversion subversion-tools
The problem I have is remembering the repro address. Make sure that you're in /home/ccc
svn checkout http://www.carrubbers.org/svn/ccc/www/htdocs
svn checkout http://www.carrubbers.org/svn/ccc/www/userdb
The checkout happens and the path /home/ccc/htdocs/ should be correct. SVN doesn't cope with symbolic links at present - need to add them for pgadmin and lib/v1/

Get the postgres login details for the local filesystem.
Get a copy of the htpwd and htusergroup files.
Get a copy of the /image directory
Get a copy of all the xml and dbf files - they aren't in svn
~$ find -name *.xml | xargs tar rvf xml.tar
~$ find -name *.dbf | xargs tar rvf xml.tar
Apache:
Then comes the setup of apache.
sudo apt-get install apache2
Move the previously saved apache config to /etc/apache2/sites-available/ and enable the setup.
sudo a2dissite 000-default
sudo a2ensite ccc
sudo /etc/init.d/apache2 restart
Then we need to install PHP with dbase.

Postgres:
Finally, comes the addition of postgres - make sure the correct version is installed!
sudo aptitude search postgres
sudo apt-get install postgresql-8.1
sudo apt-get install phppgadmin pgadmin3
The other option would be to get the latest version of phppgadmin and install it in /usr/share/phadmin with a symbolic link from /admin/pgadmin.

Remote:
Connect to the CCC postgres db. Post 5432 is the standard port for postgres communication, but is closed on the CCC server. Set up a tunnel to it, but don't use port 5432 because we'll be running a local server on that port. SSH keys should be in place for passwordless login.
ssh -L5431:localhost:5432 carrubbers.org
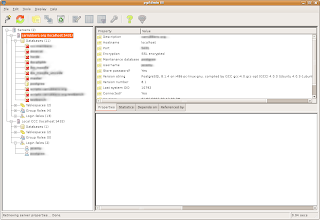
Setup pgAdminIII to connect to the remote server using localhost:5431

Local:
Start to setup the local postgres server. First thing is to create a user.
~$ sudo su postgres -c createuser yourusername
~$ sudo su postgres -c psql yourusername
=# ALTER USER yourusername WITH PASSWORD 'yourpassword';
=# \q
Setup pgAdminIII to connect to the local server using localhost:5432


Get a local copy of the postgres database.
~$ pg_dump database_name > database
~$ tar -cf database.tar database
~$ scp database local_machine:

~$ createdb master
~$ tar -xf database.tar
~$ psql -d master
Or, if you need to get the data from the entire server, use:
~$ pg_dumpall -d > pg_server
~$ psql -f pg_server postgres
Irritatingly, it will ask for your password for every transaction. ie., for every database that is dumped!

That should be us done... have a quick test.

Tuesday, January 30, 2007

Plesk 8.1 and awstats

The new version of Plesk (8.1) does seem much nicer to use than 8.01 and has a couple of extra features. One such feature is the inclusion of awstats as standard. Domains are still assigned webalizer by default, but getting awstats is just a drop down box away on the domain setup page.

Once this is done, the stats are available at: www.domain.com/webstat and are viewable using the domain's ftp username and password.

This didn't work for me initially and I just got an error that the system hadn't run the statistics cron and if it didn't work within 24h, to check with my domain admin... that's me! Well, 24h passed and nothing had changed:
/usr/local/psa/admin/sbin/statistics --calculate-one --domain-name=domain.com
After a short wait, the process was complete and a pretty awststa page appeared where it should have been all along. I'll just have to wait and see if a) it updates and b) whether this needs to be done for other domains.

Monday, January 29, 2007

Plesk and migration

Migrating accounts between plesk servers is very simple. In most cases I just want to migrate a client with all their accounts and all their settings:
sudo -s
echo 'client_name' | /opt/psa/bin/pleskbackup --clients backup_file -list -
exit
scp backup_file_name username@remote_host:
That takes care of the backup and transfer, so all that is needed is a quick mapping of IP addresses on the new host and a restore. Disable the client on the initial server to ensure that mail doesn't get delivered and lost.
ssh username@remote_host
sudo -s
/opt/psa/bin/pleskrestore --create-map backup_file -map map_name
/opt/psa/bin/pleskrestore --restore backup_file -level clients -map map_name
exit
You'll need to ensure that the mapping of the domains for the client is done correctly if there are multiple IP addresses on both systems. Most of the time, Plesk gets it correct.

Flick the DNS and all is done with minimal downtime.

Skype and Ubuntu

I know that Skype isn't maintained within the Ubuntu repositories and there is good reason for that. I did however want it - mainly because we have good friends who will, from next week be in Mexico and they'll be using Skype on their Mac.

It's a simple process to get skype working on a Ubuntu Edgy box:

add the repository to the /etc/apt/sources.list
## Official Skype Repository
deb http://download.skype.com/linux/repos/debian/ stable non-free
then its a simple apt-get away
sudo apt-get update
sudo apt-get install skype
you'll find it under Applications > Internet > Skype

Sunday, January 28, 2007

Unison and Plesk

I've been trying to optimise backups so that in the event of a catastrophic disaster on one of my servers, I'd be able to quickly and easily get them abck up and running - especially the ones that are hosting domains that are heavily email dependent or have shops. The last thing I need is people getting stressed about loosing email or money!

I've got total backup and think that it should be sufficient for performing incremental backups every day on a weekly rotation. What I'd prefer though is a mirror on a different server which could allow me to simply flick a big red DNS switch and let everything continue as if nothing had ever happened.

I'd need to work out what total backup actually backs up and sync those directories across two plesk servers... sounds complex and graught with potential disasters... and, if it's such a great idea, why can't I find somebody who's done it before?

Friday, January 26, 2007

Unison and USB

I was having some problems getting my trusty USB key and unison (the file sync software) to play together. It turns out that because my USB key is formatted as vFAT (or FAT32) to allow it to work on my Ubuntu box and Windoze machines (at work), I need to ensure that Unison doesn't try to mirror the permissions.

unison usb -perms=0
where usb refers to the file: /home/username/.unison/usb.prf

Thursday, January 25, 2007

Using 4psa Total Backup

I have bought Total Backup from 4psa for Plesk and was having an issue with the automatic transfer of files from the host to backup server. Using FTP seems to work fine, but I couldn't work out how to use the SSH transfer.

I finally worked it out. You need to create a public/private key pair and then add these to the backup server's authorised keys within the profile of the user you want to log in as. I'd been doing this, but not as root and that was why the transfer was falling over - shame the debugging info wasn't that great.

Login to the backup server and create the account for the backup.
sudo adduser rbackup
Now log into the host server, create keys and enable passwordless login to the remote backup server - remember not to specify a passphrase for the key pair.
sudo -s
ssh-keygen -t rsa
ssh-copy-id -i /root/.ssh/id_rsa.pub rbackup@backup.server.tld
Confirm the login process by ssh rbackup@backup.server.tld

If you don't now create the directory that tbackup is expecting to log into remotely, it fails with a very unhelpful message. So, if (in the settings section of the tbackup page within Plesk), you have set backups to be stored in /rbackup/foo, you need to ensure that his exists on the remote system.

If there are issues with tbackup and you need to do some debugging:
/usr/local/tbackup/do_backup -d

Wednesday, January 24, 2007

MythTV

I've just been having a look at MythTV and am very interested in taking a Ubuntu Edgy (or Feisty) system and installing Myth on it. Myth, for those who don't know, is a media center which looks very polished. Then I could rip all my DVDs! Now there's a task that would take a significant amount of time!

Keeping an eye on hardware

Adding a task bar icon to keep an eye on hard drive and CPU temp was my latest challenge.

A challenge that was easily met by sensors-applet, a GNOME task bar applet:
sudo apt-get install sensors-applet
sudo apt-get install hddtemp
After that, a quick right click on the task bar and "Add to panel" was all that was needed before a graph akin to CPU usage appeared telling me how hot the CPU was - better get that fan turned up!

Thursday, January 18, 2007

Plesk 8.1 and spamassassin

I've just finished putting together a new UK2 Plesk server and found a problem when trying to "spamassassin --lint" after installing Spam Guardian.
Failed to run DNS_FROM_AHBL_RHSBL RBL SpamAssassin test, skipping:
(Can't call method "bgsend" on an undefined value at
/usr/lib/perl5/site_perl/5.8.5/Mail/SpamAssassin/Dns.pm line 112.
It would appear as though some required perl libs aren't loaded which can be proven with:
# perl -e "use Net::DNS::Resolver"
So, a quick couple of apt-get installs are required to load the respective libraries:
# apt-get install libnet-ip-perl libnet-dns-perl
I'm not sure why these aren't loaded as dependancies of spamassassin, but adding the libs seems to have fixed the problem. Recheck the "spamassassin --lint" and the errors should have gone.

Setting up a new UK2 server

Basic server setup

Once the email from UK2 has arrived with confirmation of the server, log into the server as root, change the password and upgrade all the current packages (be aware of previous kernel updates that have caused kernel-panics at boot:
ssh root@server12345.uk2net.com
passwd
apt-get upgrade
Upgrade out of date packages and setup the sudo function
apt-get install sudo
nano /etc/sudoers
Add the line %admin ALL=(ALL) ALL to the bottom of the file. Now add some real users and a group called admin; add users to the admin group if they are sudoers.
adduser username
groupadd admin
usermod -G admin username
Setup some other basic packages and admin tasks
apt-get install joe lynx
joe /etc/motd - Welcome to...
joe /etc/ssh/sshd_config - PermitRootLogin no
sudo /etc/init.d/ssh restart
Setup the hosts file (/etc/hosts)
127.0.0.1 localhost.localdomain localhost

83.170.97.143 luffness.humblehosting.co.uk luffness

83.170.75.20 kilspindie.konsulting.ltd.uk kilspindie
83.170.73.70 kingsacre.konsulting.ltd.uk kingsacre
83.170.73.111 kingussie.konsulting.ltd.uk kingussie
Logout of the root account and setup passwordless login to the new server
ssh-keygen -t rsa - follow the hints (don't enter a passphrase)
ssh-copy-id -i ~/.ssh/id_rsa.pub username@host
Log into your new account and check that you aren't prompted for a password.

Firewall

The next job is to remove the firewall that comes preinstalled with some UK2 debian boxes. A quick check should allow confirmation of any rules that are set
sudo iptables -L

If rules are setup, the following commands followed by a reset should reset the firewall and remove it.
sudo -s
cd /etc/init.d/
rm -rf firewall
cd /etc/rc2.d/
./S22firewall_setup
shutdown -r now
Copy across the Plesk installer
chmod +w psainstaller....
./psainstaller...
choose the appropriate sections of Plesk to install and let the installer do the work.

Plesk web

Log into the Plesk web interface as admin:setup and follow the on screen instructions to setup the hostname, IP addresses, admin account and first client account.
  • Check the firewall is installed and running
  • Switch on and setup Watchdog
  • Run the security check for the first time
  • Increase server idle timeout (90 min)
  • Run updater and update settings
  • Setup IP addresses
  • Fix contact name and login for client account
Copy across the 4PSA installers: Spam Guardian and Total Backup (minimum)
Also copy across the SafeCat deb (http://www.4psa.com/software)

Spam Guardian

move the tarred installer to /usr/local/src
unzip the installer - [tar -zxf]
chmod 777 sguardian_directory
double check the install.txt file

sudo dpkg -i safecat*.deb
sudo apt-get install spamassassin
sudo ./install.sh - follow instructions
  • Ensure that domain and client creation and modification works
  • Check the service restart works
  • Install the license and perform the server checks again
Double check that a "spamassassin --lint" doesn't throw any errors (in the early versions of 8.1 and SG 3.0.3, some libs were missing):
apt-get install libnet-ip-perl libnet-dns-perl
Copy the rules_du_jour scripts to /usr/local/sbin/
Copy the RDJ config file to /etc/rulesdujour/
Run RulesDuJour and watch the rules get updated.
Add a cron to run the script at a random time in the morning.

Total Backup
move the tarred installer to /usr/local/src
unzip the installer - [tar -zxf]
chmod 777 sguardian_directory
double check the install.txt file

sudo apt-get install bzip2 ftp
sudo ./install.sh
Licences

Next important thing is to setup the licences for Plesk, Spam Guardian and Total Bakcup. Download them from their respective repositories and use the web-based GUIs for each system to seach for the licence and upload it.

Munin
sudo apt-get install munin-node
sudo joe /etc/munin/minin-node.conf

add host_name [hostname.example.com]
add allow ^192\.168\.2\.1$ [where 192.168.2.1 is the muine server IP]

sudo /etc/init.d/munin restart
Browse to the firewall module as admin and open a port:4949 to the IP address of the munin server.

Saturday, January 13, 2007

Edgy Eft re-install

This is just a quick reminder of the install process for Edgy Eft. All in all, it took about 2 hours + data copying time.

CD install
login...

Basic setup
check hardware
sudo apt-get upgrade
restart...

stop gedit from saving backups!
change the gedit settings - font: monospace 9
change the terminal settings - font: monosapce 9

setup hostname
setup /etc/hosts
setup /etc/network/interface

Setup the GDM
sudo apt-get install nvidia-glx
backup the original working xorg.conf file
copy the xorg.conf file to /etc/X11
restart GDM

login...


auto-adjust both flat-panels
move panels and reset
add 'force-quit', 'system monitor'
create 4 desks
setup system monitor (50px) CPU, harddisk, network
add application icons


Add useful applications
add the universe repository
sudo apt-get install joe muine gstreamer0.8-mad gstreamer0.10-fluendo-mp3
sudo apt-get install easytag unison unison-gtk
Setup unison
copy usync to /usr/local/sbin/
copy data from backup server
copy unison config files to the .unison directory
perform the sync
copy mvb to /usr/local/sbin/
setup a panel launcher for unison-gtk backup
setup a panel launcher for unison-gtk usb -perms=0

Remaining setup
create desktop connections to useful servers
setup passwordless login with keys (don't enter a passphrase)
ssh-keygen -t rsa
ssh-copy-id -i ~/.ssh/id_rsa.pub username@host
setup printers
re-install google-earth